Reports
An Organization Administrator is able to download and run reports on demand or schedule them in advance as needed. The reports available to run are:
- Call Reports
- Emergency Call Details
- Emergency Call Totals
- ERC Call Details
- Device/User Reports
- Device Users
- HELD Devices
- Location Reports
- Building
- Location
- Recent Issues
- HELD Devices without a Location
- HELD+ Devices without a Location
- MyE911 Users without a Location
- Network Elements without a Location
- Network Element Reports
- BSSID
- LLDP Chassis
- LLDP Port
- MAC Address
- Private IP Ranges
- Public IP Range
Create a Report
To create a report:
- Navigate to the Create Reports page housed within the Reports menu at the left sidebar. Note that some menu items may be missing depending on your role.
- Expand the report sections to locate the desired report.

- Select Run and Download Now or Schedule Report from the report's action menu.
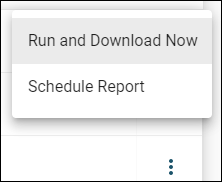
Run and Download Now
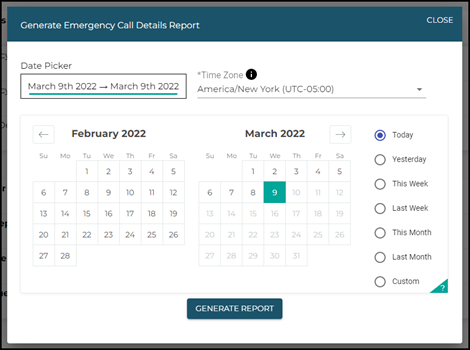
To run and download a report on-demand:
- Select Run and Download Now from the report's action menu.
- Select a date range using the interactive calendar or preset selections at the right.
- Today: Starts at 12:00:00 AM on the current day and continues for 24 hours.
- Yesterday: Starts at 12:00:00 AM on the day before the current day and continues for 24 hours.
- This Week: Starts at 12:00:00 AM on the first day (Sunday) of the current week and continues for seven days.
- Last Week: Starts at 12:00:00 AM on the first day (Sunday) of the week before the current week and continues for seven days.
- This Month: Starts at 12:00:00 AM on the first day of the current month and continues for all the days of that month.
- Last Month: Starts at 12:00:00 AM on the first day of the month before the current month and continues for all the days of that month.
- Custom: Automatically selected when choosing a user-defined date range via the calendar.
- Select a time zone using the Time Zone dropdown menu.
- This field will only be selectable for reports in which a time zone is relevant to the data in the report. The time zone selection will adjust the time outputted in the report accordingly.
- Click Generate Report. A CSV file will download onto your computer.
Schedule Report
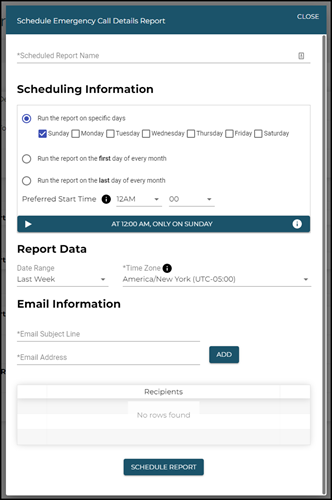
An Organization Administrator can schedule reports to be run at scheduled times with specified data included. Follow the below steps to schedule a report.
- Select Schedule Report from the report's action menu.
- Complete the following fields as required:
- Scheduled Report Name
- Scheduling Information: Days and times when you would like the report to run.
- Report Data
- Date Range
- Time Zone (if applicable)
- Email Information: Used for sending automated emails to designated recipients upon report generation.
- Email Subject Line
- Email Address
- Click Generate Report.
Scheduled Reports
All scheduled reports are viewable on the Scheduled Reports page within the Reports menu at the left sidebar. A table will display the following data about each scheduled report:
- Report Schedule Name
- Report Type
- Scheduling Information
- Recipients
- Status
- Details

Report Details
Clicking the details icon shows you more information about a specific report:
- Report Schedule Name
- Report Type
- Scheduling Information
- Status
- Date Range
- Email Subject Line
- Recipients
- Last Run Time
- Created On
- Last Updated By
- Last Updated On
Edit a Scheduled Report
- Select Edit from the report's action menu.

- Make changes to the following fields as required:
- Scheduled Report Name
- Scheduling Information
- Day of week and time of day to generate report
- Report Data
- Date Range
- Time Zone (if applicable)
- Email Information
- Recipients
- Click Schedule Report when finished.
Delete a Scheduled Report
- Select Delete from the report’s action menu.
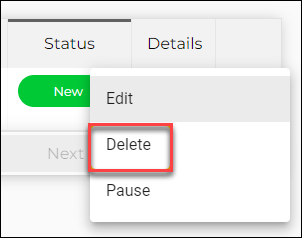
- Click Delete in the dialog box that displays.
Pause/Resume Scheduled Report
When a report is scheduled, select Pause from the report's action menu to pause it. This action will update the Status column of that report to Paused.

When a report is paused, select Resume from the report's action menu to re-activate it. This action will update the Status column of that report to New.

The Status column of a given report will change to In Progress when the report is being compiled.